Period:Unknown Production date:6thC
Materials:plaster, 石膏 (Chinese),
Technique:painted
Subjects:deity 神 (Chinese)
Dimensions:Height: 16.60 centimetres Width: 15.70 centimetres
Description:
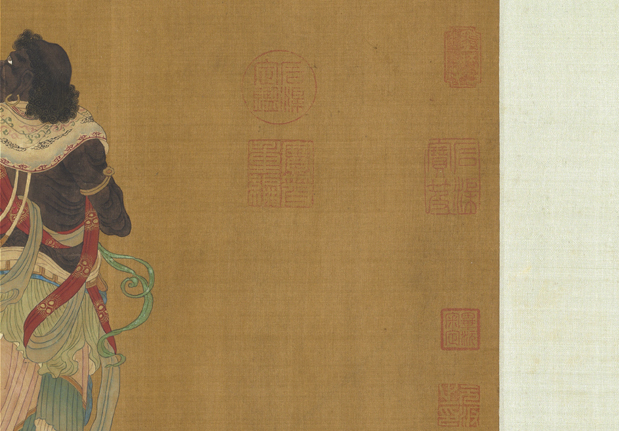
Fragment of wall-painting showing Gaṇeśa. Only the elephant head and the upper body of the deity remain. He wears a necklace and armlets. Three of his four arms are still visible, in his hands, he holds a goad, a broken tooth and a tray of sweets.
IMG
![图片[1]-wall-painting; 壁畫(Chinese) BM-1919-0101-0.268-China Archive](https://chinaarchive.net/Unknown/Paintings/mid_01127612_001.jpg)
![图片[2]-wall-painting; 壁畫(Chinese) BM-1919-0101-0.268-China Archive](https://chinaarchive.net/Unknown/Paintings/mid_00012052_001.jpg)
![图片[3]-wall-painting; 壁畫(Chinese) BM-1919-0101-0.268-China Archive](https://chinaarchive.net/Unknown/Paintings/mid_00322169_001.jpg)
Comments:EnglishFrom Whitfield 1985 (referring to 1919,0101,0.261, 268 and 275):The first three of these fragments are all from a large square shrine at Khadalik from which Stein recovered many manuscripts and fragments of wall painting (the largest section of painted wall with stencilled Buddhas from the cella of this shrine is shown among the text figures to the Introduction of Vol. 1). The fourth piece is also from Khadalik, but its exact position on the site is not known. The site was abandoned towards the end of the eighth century, as established by Stein from finds of coins at the site (see Serindia, Vol. I, p. 159).Although the figure of Ganesa is somewhat coarsely drawn, the other figures are finely delineated. The head of the Buddha in particular may be compared to a larger fragment (see Serindia, Pl. XI, Kha. i. C. 0097) from the centre of the shrine. Although this larger fragment, which is still in the British Museum, has suffered considerably since its reproduction by Stein, the plate in Serindia shows both the splendour of the original composition and the way in which it was related to small seated figures of the Buddha, alternating in background colour. The Buddha is seated with hands in the teaching mudra; his lotus throne has two rows of fleshy petals, symmetrically disposed. Behind him is a mandorla of stylized flames. On either side stand tall Bodhisattvas, swaying at the waist slightly towards the Buddha, the legs very stiff and straight. Their form is close to that of the individual Bodhisattvas of Vol. 1, Pls. 46-48, and the stance recurs much later in most of the paintings found by Kozlov at Kharakhoto and now in the Hermitage Museum, Leningrad (cf. Dieux et demons de l’ Himalaya, Nos.22-23, p. 77ff). Small seated Buddhas, all with their heads slightly inclined in three-quarters view, surround the whole composition, which thus appears as a Buddha triad on a ground of regularly alternating smaller figures, on a smaller scale but with the same organization as that to be found in the Sui and Tang caves at Dunhuang. Joanna Williams (1973,p. 110) has pointed out how important this fragment is, since it “connects a variety of types of image which are usually preserved only in fragments.”Another sizeable fragment, Kha. i. E. 0058. c, unfortunately not reproduced here or in Serindia, has four of the small Buddhas with colours well preserved: white and red alternate in the mandorlas and ground, with occasional nimbi or mandorlas of purplish pink, while the Buddha’s robe may be red, black brown or white. Each is seated on a flat-topped padmasana with down-turned petals. The main facial features are outlined in red, but the pupils, upper eyelids and eyebrows are in ink. The two small fragments shown in Fig. 42 are of this type. (Figure 49, though a wooden plaque and not a wall painting, shows the correct angle at which the head was inclined; a single larger head, Kha. i. 0054,is reproduced in Serindia, Pl. XI.) The few drapery lines are in ink and occasionally accented in white, but on the whole the painters seem to have preferred the use of areas of colour without outline, so that the figures have a simple solidity. No lines are ruled between the Buddhas, the frame for each being established by the simple counterchange of colours in the ground.Among the other fragments shown in the monochrome figures, Fig. 44 displays brilliant colours: the bodhisattva, presumably Avalokitesvara since he holds a flask, wears azure trousers; his body, outlined in red, is pink against a bright green mandorla with broad brown and red borders. The small figure nearby appears to be a donor. Plate 53-4 shows some of the same blue, less brilliant in reproduction than in the original, combined with delicate outlines and subtle green and pink shades, in a fragment of the Cosmic Vairocana with the sun disc on his shoulder and a vajra on the forearm (cf. Pl. 72 and Figs. 50, 95). Such pieces afford a mere glimpse of the wealth and quality of Khotanese painting, and it is interesting that one fragment (Fig. 43) shows a hand grasping a writing brush: the handle is of wood, with a close binding and slightly swelling bundle of hairs at the end. ChineseFrom Whitfield 1985:前三件都是從喀達里克的大方形寺址攜來的斷片,斯坦因從那裏還發現了許多文書類和壁畫斷片(寺院内殿用模板繪的千佛壁畫,刊載於本書第1卷的《導言》部分的插圖中)。第四張斷片也是從喀達里克發現的,但不知是否在這個寺址出土的。斯坦因據在此地發現的硬幣推斷,此遺迹可能是8世紀結束時廢棄的(參照《西域》159頁)。智慧神像有幾分粗劣,其他諸像描繪的相當精細。特別是佛頭可與該寺址中央位置發現的大斷片(參照《西域》圖版XI, Kha.l.C.0097)相比較。斯坦因將大斷片收錄在《西域》的圖版內,當時看來破損嚴重,故本書未收錄。看《西域》圖版,就會發現當初極壯觀的構圖,以及有規則地配置小佛坐像、背景顔色變換等技法。中尊佛兩手結說法印,結跏趺坐在蓮華座上,蓮花座由兩層豐滿蓮瓣對稱排列而成,背後是模式化曼陀羅火焰紋的背光。左右有長身的菩薩,腰略傾向佛立著,其腿筆直僵硬。此菩薩的姿態,與本書第1卷圖46-48的諸菩薩像,以及科茲洛夫發現于黑水城現存於艾爾米塔什美術館,時代稍晚的繪畫(參照《喜瑪拉亞的神與魔》,圖22、23,頁77)中所見的相似。這些主尊群的周圍,配有略向前傾的小佛坐像,這看來恰似佛三尊突出在有規則地分配小佛像的背景中。此小佛群,規模雖小,但讓人想起敦煌隋唐窟中所見千佛的結構。Joanna Williams也指出,此斷片的重要性,就在於各個零七八碎很難拼合的斷片上,能看出像與像間的相互關係(參照《和田佛教美術的圖像》,1973,110頁)。此外,《西域》中沒有收錄,遺憾的是本書選材時也遺漏了的,還有色彩保存較好的四身小佛的略大些的斷片Kha.i.E.0058.c。那斷片上,身光和底色交替搭配著白和紅色,紅色時而在頭光上,時而又用在身光上。而佛的衣服爲紅、黑、茶、白等色,都坐在平坦的覆瓣蓮花座上。臉部的主要部分用朱線描繪,瞼和眉毛使用了黑色。Fig. 42展示的兩塊斷片與此是同類作品(收錄於《西域》圖版XI的繪有佛頭的斷片Kha.i.0054,也是與此同類的作品。另外,本書Fig. 49,雖然是板繪而不是壁畫,但前側向的臉部表現與此相同)。衣紋線使用黑色,偶爾用白色來突出,大概是畫家比較喜歡省略輪廓線而以色面來表現,佛像具有一點立體感。各小佛坐像間沒有分界線,只是調換每個像框的底色來體現。黑白圖版展示的壁畫斷片中,Fig. 44可見有美麗的色彩:從手持淨瓶判斷是觀音菩薩,身著淡青色衣裙,有紅色輪廓的肉身上染了淡紅色,與有茶和紅色寬邊的亮綠色背光形成鮮明的對比。近處的小像可能是供養人。圖53-4中,可見精細的輪廓線和淡紅的暈染,有美麗的淡綠和青的色彩。一個斷片為肩有日輪、前臂有金剛的毗盧遮那佛(參見圖72 及 Figs. 50, 95),從這些壁畫的斷片,可窺到和田壁畫的興盛及其品質的一端,而描繪著手握毛筆的一個斷片(Fig. 43)也是饒有意義的。那筆的桿是木製的,略有些蓬鬆的毛束被牢固地捆在一起。
Materials:plaster, 石膏 (Chinese),
Technique:painted
Subjects:deity 神 (Chinese)
Dimensions:Height: 16.60 centimetres Width: 15.70 centimetres
Description:
Fragment of wall-painting showing Gaṇeśa. Only the elephant head and the upper body of the deity remain. He wears a necklace and armlets. Three of his four arms are still visible, in his hands, he holds a goad, a broken tooth and a tray of sweets.
IMG
Comments:EnglishFrom Whitfield 1985 (referring to 1919,0101,0.261, 268 and 275):The first three of these fragments are all from a large square shrine at Khadalik from which Stein recovered many manuscripts and fragments of wall painting (the largest section of painted wall with stencilled Buddhas from the cella of this shrine is shown among the text figures to the Introduction of Vol. 1). The fourth piece is also from Khadalik, but its exact position on the site is not known. The site was abandoned towards the end of the eighth century, as established by Stein from finds of coins at the site (see Serindia, Vol. I, p. 159).Although the figure of Ganesa is somewhat coarsely drawn, the other figures are finely delineated. The head of the Buddha in particular may be compared to a larger fragment (see Serindia, Pl. XI, Kha. i. C. 0097) from the centre of the shrine. Although this larger fragment, which is still in the British Museum, has suffered considerably since its reproduction by Stein, the plate in Serindia shows both the splendour of the original composition and the way in which it was related to small seated figures of the Buddha, alternating in background colour. The Buddha is seated with hands in the teaching mudra; his lotus throne has two rows of fleshy petals, symmetrically disposed. Behind him is a mandorla of stylized flames. On either side stand tall Bodhisattvas, swaying at the waist slightly towards the Buddha, the legs very stiff and straight. Their form is close to that of the individual Bodhisattvas of Vol. 1, Pls. 46-48, and the stance recurs much later in most of the paintings found by Kozlov at Kharakhoto and now in the Hermitage Museum, Leningrad (cf. Dieux et demons de l’ Himalaya, Nos.22-23, p. 77ff). Small seated Buddhas, all with their heads slightly inclined in three-quarters view, surround the whole composition, which thus appears as a Buddha triad on a ground of regularly alternating smaller figures, on a smaller scale but with the same organization as that to be found in the Sui and Tang caves at Dunhuang. Joanna Williams (1973,p. 110) has pointed out how important this fragment is, since it “connects a variety of types of image which are usually preserved only in fragments.”Another sizeable fragment, Kha. i. E. 0058. c, unfortunately not reproduced here or in Serindia, has four of the small Buddhas with colours well preserved: white and red alternate in the mandorlas and ground, with occasional nimbi or mandorlas of purplish pink, while the Buddha’s robe may be red, black brown or white. Each is seated on a flat-topped padmasana with down-turned petals. The main facial features are outlined in red, but the pupils, upper eyelids and eyebrows are in ink. The two small fragments shown in Fig. 42 are of this type. (Figure 49, though a wooden plaque and not a wall painting, shows the correct angle at which the head was inclined; a single larger head, Kha. i. 0054,is reproduced in Serindia, Pl. XI.) The few drapery lines are in ink and occasionally accented in white, but on the whole the painters seem to have preferred the use of areas of colour without outline, so that the figures have a simple solidity. No lines are ruled between the Buddhas, the frame for each being established by the simple counterchange of colours in the ground.Among the other fragments shown in the monochrome figures, Fig. 44 displays brilliant colours: the bodhisattva, presumably Avalokitesvara since he holds a flask, wears azure trousers; his body, outlined in red, is pink against a bright green mandorla with broad brown and red borders. The small figure nearby appears to be a donor. Plate 53-4 shows some of the same blue, less brilliant in reproduction than in the original, combined with delicate outlines and subtle green and pink shades, in a fragment of the Cosmic Vairocana with the sun disc on his shoulder and a vajra on the forearm (cf. Pl. 72 and Figs. 50, 95). Such pieces afford a mere glimpse of the wealth and quality of Khotanese painting, and it is interesting that one fragment (Fig. 43) shows a hand grasping a writing brush: the handle is of wood, with a close binding and slightly swelling bundle of hairs at the end. ChineseFrom Whitfield 1985:前三件都是從喀達里克的大方形寺址攜來的斷片,斯坦因從那裏還發現了許多文書類和壁畫斷片(寺院内殿用模板繪的千佛壁畫,刊載於本書第1卷的《導言》部分的插圖中)。第四張斷片也是從喀達里克發現的,但不知是否在這個寺址出土的。斯坦因據在此地發現的硬幣推斷,此遺迹可能是8世紀結束時廢棄的(參照《西域》159頁)。智慧神像有幾分粗劣,其他諸像描繪的相當精細。特別是佛頭可與該寺址中央位置發現的大斷片(參照《西域》圖版XI, Kha.l.C.0097)相比較。斯坦因將大斷片收錄在《西域》的圖版內,當時看來破損嚴重,故本書未收錄。看《西域》圖版,就會發現當初極壯觀的構圖,以及有規則地配置小佛坐像、背景顔色變換等技法。中尊佛兩手結說法印,結跏趺坐在蓮華座上,蓮花座由兩層豐滿蓮瓣對稱排列而成,背後是模式化曼陀羅火焰紋的背光。左右有長身的菩薩,腰略傾向佛立著,其腿筆直僵硬。此菩薩的姿態,與本書第1卷圖46-48的諸菩薩像,以及科茲洛夫發現于黑水城現存於艾爾米塔什美術館,時代稍晚的繪畫(參照《喜瑪拉亞的神與魔》,圖22、23,頁77)中所見的相似。這些主尊群的周圍,配有略向前傾的小佛坐像,這看來恰似佛三尊突出在有規則地分配小佛像的背景中。此小佛群,規模雖小,但讓人想起敦煌隋唐窟中所見千佛的結構。Joanna Williams也指出,此斷片的重要性,就在於各個零七八碎很難拼合的斷片上,能看出像與像間的相互關係(參照《和田佛教美術的圖像》,1973,110頁)。此外,《西域》中沒有收錄,遺憾的是本書選材時也遺漏了的,還有色彩保存較好的四身小佛的略大些的斷片Kha.i.E.0058.c。那斷片上,身光和底色交替搭配著白和紅色,紅色時而在頭光上,時而又用在身光上。而佛的衣服爲紅、黑、茶、白等色,都坐在平坦的覆瓣蓮花座上。臉部的主要部分用朱線描繪,瞼和眉毛使用了黑色。Fig. 42展示的兩塊斷片與此是同類作品(收錄於《西域》圖版XI的繪有佛頭的斷片Kha.i.0054,也是與此同類的作品。另外,本書Fig. 49,雖然是板繪而不是壁畫,但前側向的臉部表現與此相同)。衣紋線使用黑色,偶爾用白色來突出,大概是畫家比較喜歡省略輪廓線而以色面來表現,佛像具有一點立體感。各小佛坐像間沒有分界線,只是調換每個像框的底色來體現。黑白圖版展示的壁畫斷片中,Fig. 44可見有美麗的色彩:從手持淨瓶判斷是觀音菩薩,身著淡青色衣裙,有紅色輪廓的肉身上染了淡紅色,與有茶和紅色寬邊的亮綠色背光形成鮮明的對比。近處的小像可能是供養人。圖53-4中,可見精細的輪廓線和淡紅的暈染,有美麗的淡綠和青的色彩。一個斷片為肩有日輪、前臂有金剛的毗盧遮那佛(參見圖72 及 Figs. 50, 95),從這些壁畫的斷片,可窺到和田壁畫的興盛及其品質的一端,而描繪著手握毛筆的一個斷片(Fig. 43)也是饒有意義的。那筆的桿是木製的,略有些蓬鬆的毛束被牢固地捆在一起。
© Copyright
The copyright of the article belongs to the author, please keep the original link for reprinting.
THE END
![[Qing Dynasty] British female painter—Elizabeth Keith, using woodblock prints to record China from the late Qing Dynasty to the early Republic of China—1915-China Archive](https://chinaarchive.net/wp-content/uploads/2022/11/image-191x300.png)